As I write this in January 2022, the UK is facing an energy crisis that is driving up prices for gas and electricity to well beyond what most are able to budget for. I won’t turn this into a political rant, because that’s not what you’re here for, however there’s a lot more to it than just the increasing scarcity of fossil fuels and so we need to take smarter steps in order to reduce our usage.
Many of us here in the UK simply can’t afford to retro-fit solar panels to our houses, and private wind turbines aren’t really a thing, so how do we track our usage throughout the day and keep an eye on what we’re using? Home Assistant of course!
Now, before I get too far into this post, I want to give a massive shout of thanks to the folks over at Hildebrand GlowMarkt. I’m not affiliated with them in any way, nor have they sponsored (or even offered to sponsor!) this post, but the help and guidance they’ve provided in getting this set up has been fantastic and I’m looking forward to purchasing some of their products in the next couple of months.
With that out of the way, let’s get started…
Energy Monitoring Choices
When it comes to monitoring the energy we use, there are a number of places we can take readings from. Some devices have it built in, we can use “smart sockets” (about which I’ll do another post in future), or we can use our “smart” meters to get the measurements at the point of supply.
As you can imagine, if we want granular data we’ll need to collect it as close to the devices as possible, whereas if we only care about whole-house usage then collecting it from the smart meters is perfectly fine.
Smart Sockets
Whislt I’ll provide a full post on smart sockets in future (including “wall-warts” vs wall-mounted and the various features that are available), the main thing that you need to know about smart sockets is that not all of them provide energy monitoring as standard.
I own a number of different makes of zigbee-based smart socket, from the Sonoff S26R2ZB, Innr Smart Plug, and LEDVANCE Smart+ Plug, through to the (rather more expensive!) Aurora AOne Sockets.
Of all these devices, only the Aurora supports energy monitoring. The others can be easily controlled, but there’s no way of knowing how much power is flowing through them.
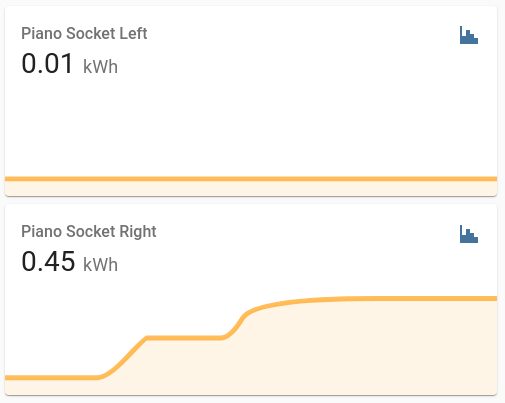
The image above shows the output in Home Assistant once you have configured the sockets as energy sources, and as long as you know what’s plugged in to each, you’re already on your way to seeing what the power draw is (in this case it’s a couple of phone chargers and an electric piano).
This is a good start, but in order to get an overview of our full electricity costs we’re going to need to replace every socket in the house with one that can report back on energy usage, and that’s a lot of money just on sockets, probably far more than we’ll ever save through monitoring our usage, so what’s the other option?
Smart Meters
If you’re fortunate enough to have a decent energy provider, then you will have been offered a “smart” meter in the past few years. “Smart” meters are not able to connect to your home network, nor can they send updates directly to Home Assistant, but they do report your usage back to your energy company on a regular basis and come with a Consumer Access Device (CAD) that allows you to view your usage in near real-time.
Frustratingly however, there are two types of “smart” meter in the UK:
- SMETS1 - the original generation of smart meter. If you switch away from the original supplier it immediately loses it’s abilty to be “smart” and you have to send meter readings in manually again
- SMETS2 - the newer generation of smart meters. Continues to be “smart” even if you change supplier.
Thankfully, through a process called “the DCC rollout”, SMETS1 meters are being upgraded to new firmware which will bring them into line with SMETS2 meters, so very soon none of us will need to give a meter reading to the power company ever again!
Once your meters are connected to The DCC (A government body responsible for overseeing smart meter rollouts), you’ll be able to get data from your energy supplier, but as not all of the energy suppliers have an API, it can be tricky getting your hands on the data in a nice format for Home Assistant.
So how do we get what we want?
This is where the folks at Hildebrand GlowMarkt come in.
They have a free app (Android, Apple) that will connect to your smart meter data from the DCC and allow you to view that data on your phone.
The best part is that they also have an API, so HandyHat has written an integration for Home Assistant to pull the data from the DCC into your Home Assistant Energy Monitoring dashboards!
Setting up the system couldn’t be easier. The first thing you’ll need to do is install the Bright app onto your phone from the links above, and follow the instructions to get it talking to your meters.
Once you’ve got the data showing in the app, install the ha-hildebrandglow-dcc app in Home Assistant via HACS (you’ll need to install it as a custom repo in HACS, so make sure you follow the instructions!) and then head over to your integrations page in the configuration section of home assitant, install ha-hildebrandglow-dcc and input the username and password you used to sign up for the Bright app. You should get a confirmation that the credentials were correct and that the login worked.
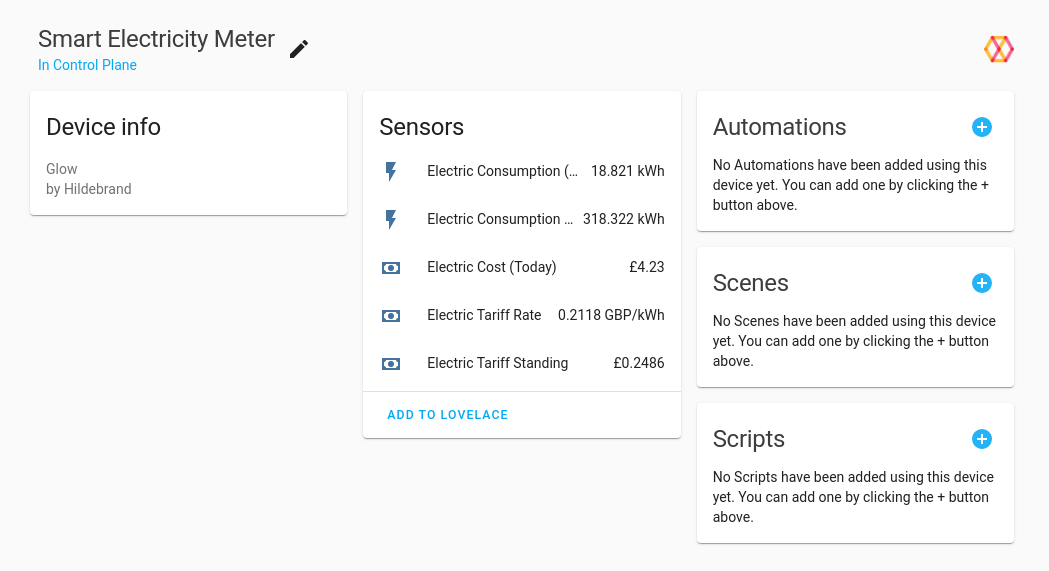
If you browse your devices, you should also see that new devices have been created for each of your smart meters, with various entities for power consumption and (if you’re lucky, not all suppliers provide this) ctarrif costs.
Configuring Home Assistant
Head back to the main settings in Home Assistant and click on the Energy panel in the list. You should be taken to a page that looks similar to the following (but without any devices configured!):
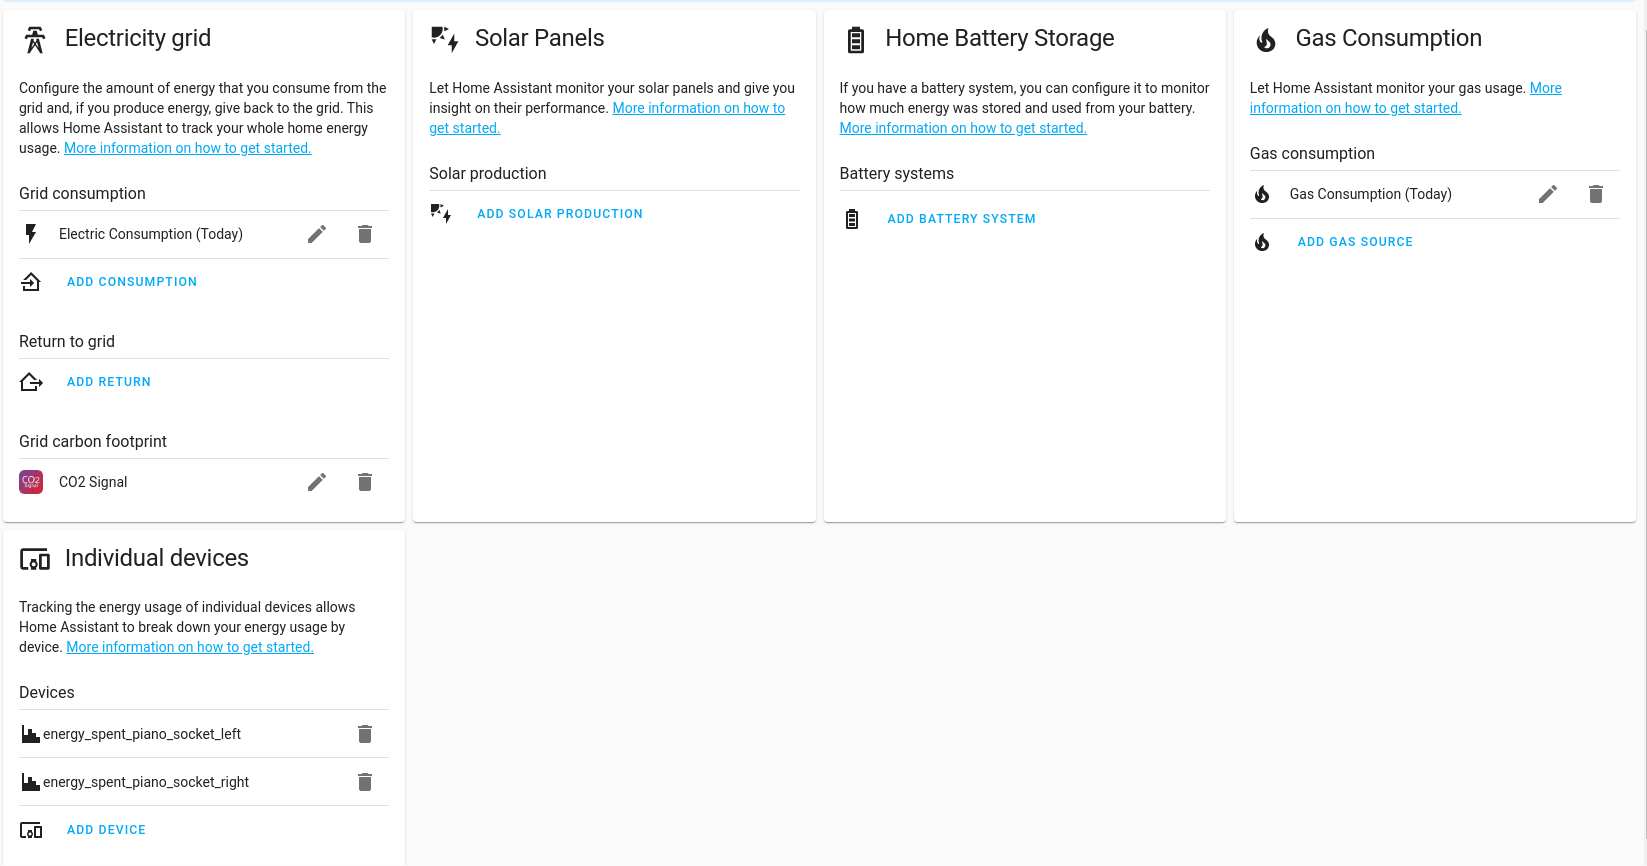
Note the banner at the top of the page stating that it could take up to two hours for data to show once the devices are added. In my case, it took about 30 minutes for the data to show up and then a further 30 minutes for the tarrif information, but I know others for whom it took longer, so please be patient!
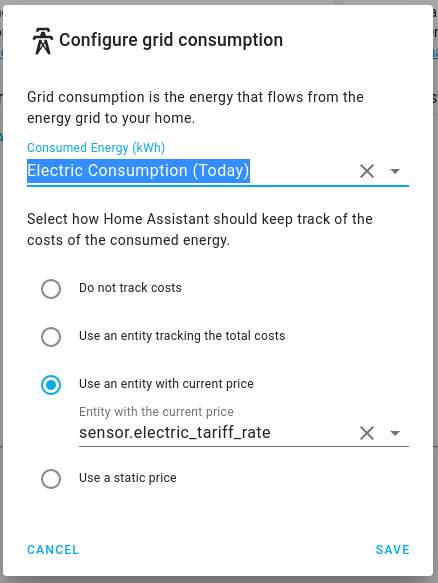
Now click Add Consumption under the Electricity panel, and select Electric Consumption (Today) from the list of possible entities. If you have access to your tarrif as an entity, then select that in the Use an entity with current price field:
Repeat this process for the Gas panel and save your changes.
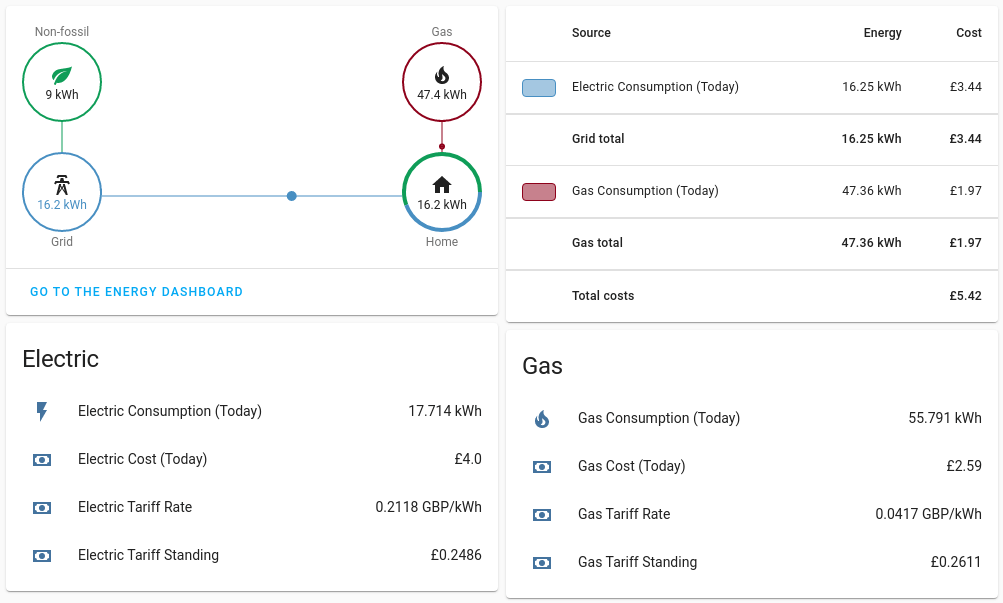
Viewing the data
Once you’ve configured the devices, you can view the data in the Energy dashboard, accessible from the left hand side of the screen. This will show you consumption rates by the day, week, month, and year, as well as an animated graph of the current usage.
If you want to incorporate these same panels into other dashboards you won’t be able to select them from the usual Lovelace panel list, however you can add them as a manual card by following the documentation.
Finally, if you want to track the usage of your individual sockets you can do so by following these instructions and adding the devices individually on the Energy configruration screen.
What’s next?
If you’ve stuck with me along the way, then you should now have energy monitoring setup in Home Assistant, pulling the data from your SMETS meter via The DCC. At the moment, this only provides data every 30 minutes, however in a future blog post I’ll cover how to get your hands on a more advanced CAD from Hildebrand and how to configure that to provide data in real-time.
If you’ve already got solar panels and battery storage, you can follow the instructions here and here to provide a full overview of exactly how much energy you’re using, importing, and exporting from the grid.
The best thing about Home Assistant is that all of these entities are sensors, so they can be used as triggers for automations. If your usage creeps above a certain level, why not send a message to all the non-vital sockets and turn off the devices on standby, or send a message to all the speakers in the house announcing that the usage is too much?
By the same token, if you’re on a peak/off-peak tarrif, you can use the automation features of Home Assistant to start a “smart” washing machine when the cost of electrictiy drops below a certain point, or to start charging the car as soon as purchasing the power gets cheaper.
As always, the possibilities are endless, and I can’t wait to hear what you end up doing with this!