In part one of this series I laid out the various components that I used on my home network to create dashboard that gives me an overview of the platform health.
This part of the series will cover DNS and DNS Filtering using the PiHole project, then we’ll move on to the setup for container management and finally we’ll look at the monitoring side of things.
What is DNS, and why do we want to filter it?
When we connect a device to a network, it receives something called an “IP Address”. This is a series of numbers (for version 4!) or letters and numbers (version 6!) and it is unique to each device on the network.
These IP Addresses are grouped into groups of addresses called “subnets”, and then our router (remember them from the networking guide a few weeks back?) ensures that the data can flow between the subnets and across the internet.
IP Addresses for IPv4 (and that’s what we’ll focus on here as not many networks use IPv6) are made up of 4 sets of three digits between 0 and 255, separated by a full stop, with 0 and 255 being reserved values.
As an example, the following are all valid IP addresses:
10.10.10.10
127.0.0.1   # Often called "localhost" and will exist on a network-capable device even if it is not attached to another network
8.8.8.8
169.254.169.254
If you only have one network, and a handful of devices, then it’s relatively easy to track what lives where and on which address. The webserver is on 192.168.1.10, your home hub is on 192.168.1.5 etc, but then we start to get multiple subnets and significant numbers of devices and we can’t remember it all off the top of our head - this is where DNS comes in.
If the IP Address is the equivalent of a street address, DNS is the equivalent of WhatThreeWords. DNS maps human-readable, easy to remember labels to IP Addresses, letting us visit http://web/ in our browser and automatically translating that to 192.168.1.10 in the background.
So how does this help us block adverts or unwanted content?
Most websites that you visit on a day to day basis almost certainly have more than one server behind them. This means that if a website tries to tell Facebook or Google about your browsing behaviour, we can’t just block a single IP Address as the code will use DNS to access a different one.
If we block at the DNS level then it means any requests to the advertising or data collection networks can be blocked at the local network, meaning that the tracking data never leaves our network.
So how does PiHole work then?
Once PiHole is installed (more on that in a bit!), we configure it to act as a DNS server on our local network. We then point all of our clients at the PiHole installation, and when we request a website that PiHole doesn’t want us to access, it returns an error instead of resolving it to the correct IP Address.
By default, PiHole blocks adverts, however you can add additional blocklists to filter out adult content and various other services.
How do I install PiHole?
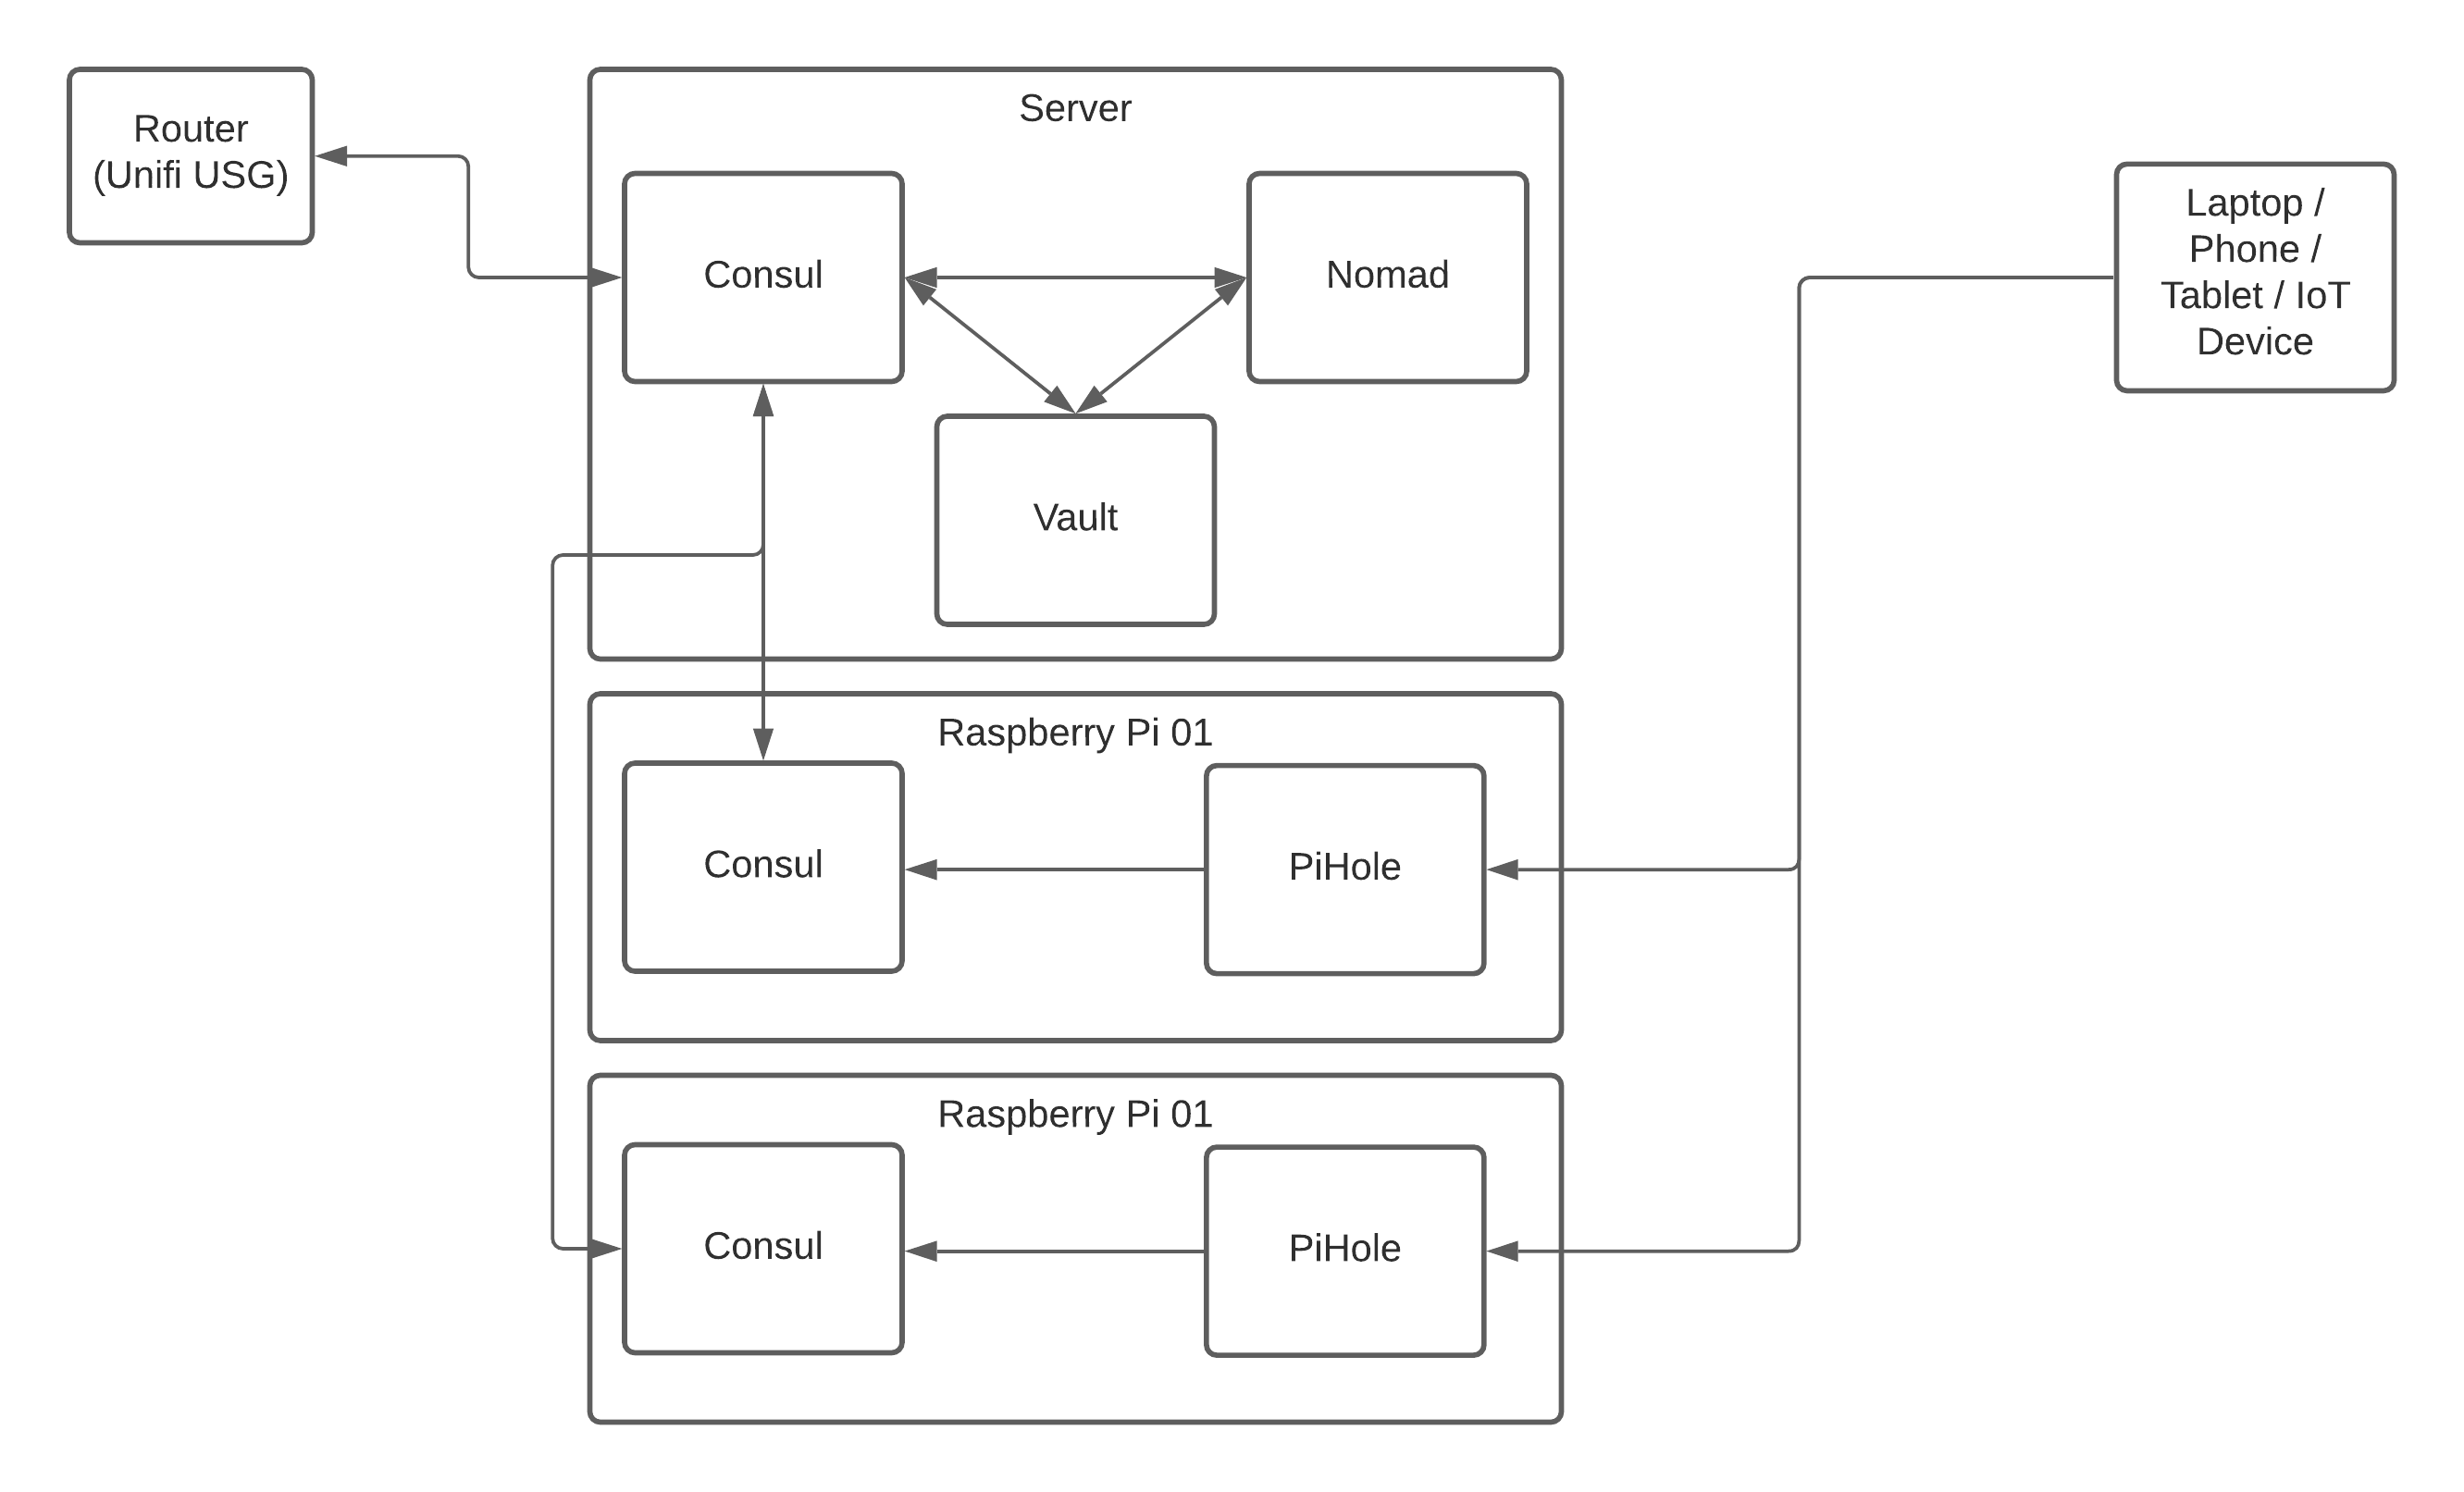
If we take another look at our network diagram, we can see that we’re going to install PiHole on a pair of Raspberry Pi computers.
It’s probably key to say here that PiHole does not need to run on a pi in order to work, it can be installed on any Linux server and even runs in docker containers, but for now we’ll stick with running it directly on a pi because it removes some of the complications around sharing resources and network ports.
It’s also worth pointing out that you can run just one copy of PiHole on your network - I’m only running two because I get complaints if “the internet” disappears for more than 30 seconds in our house, so running an extra one gives me redundancy!
The installation instructions are pretty straight forward (although I’d always recommend you read the script you’re about to run before running it like this!) so we won’t focus too much on that, but here’s what you’ll want to do in order to get up and running (Note, you’ll need to do this on both Pi’s if you’re running the same setup as I am!):
- Make sure you have a fresh installation - make sure it’s Raspberry Pi OS Lite, and before you put the SD Card into the pi, open it in file manager and add a completely empty file called
sshto the boot partition - Assign the Raspberry Pi a static IP Address on your router.
- Boot the Pi and log in via SSH (If you’re on Windows, take a look at Putty for an SSH Client) - you’ll want to use
pias the username, andraspberryas the password - Change the password to something more secure by running
passwdand enteringraspberryfor the “Current Password” and something of your own creation as the “New Password” - Update the Pi to the latest version of the operating system by running
sudo apt update && sudo apt upgrade -y - Reboot the pi
- Reconnect to the pi and run the PiHole installer - Accept the default DNS servers for now, we’ll add our own later.
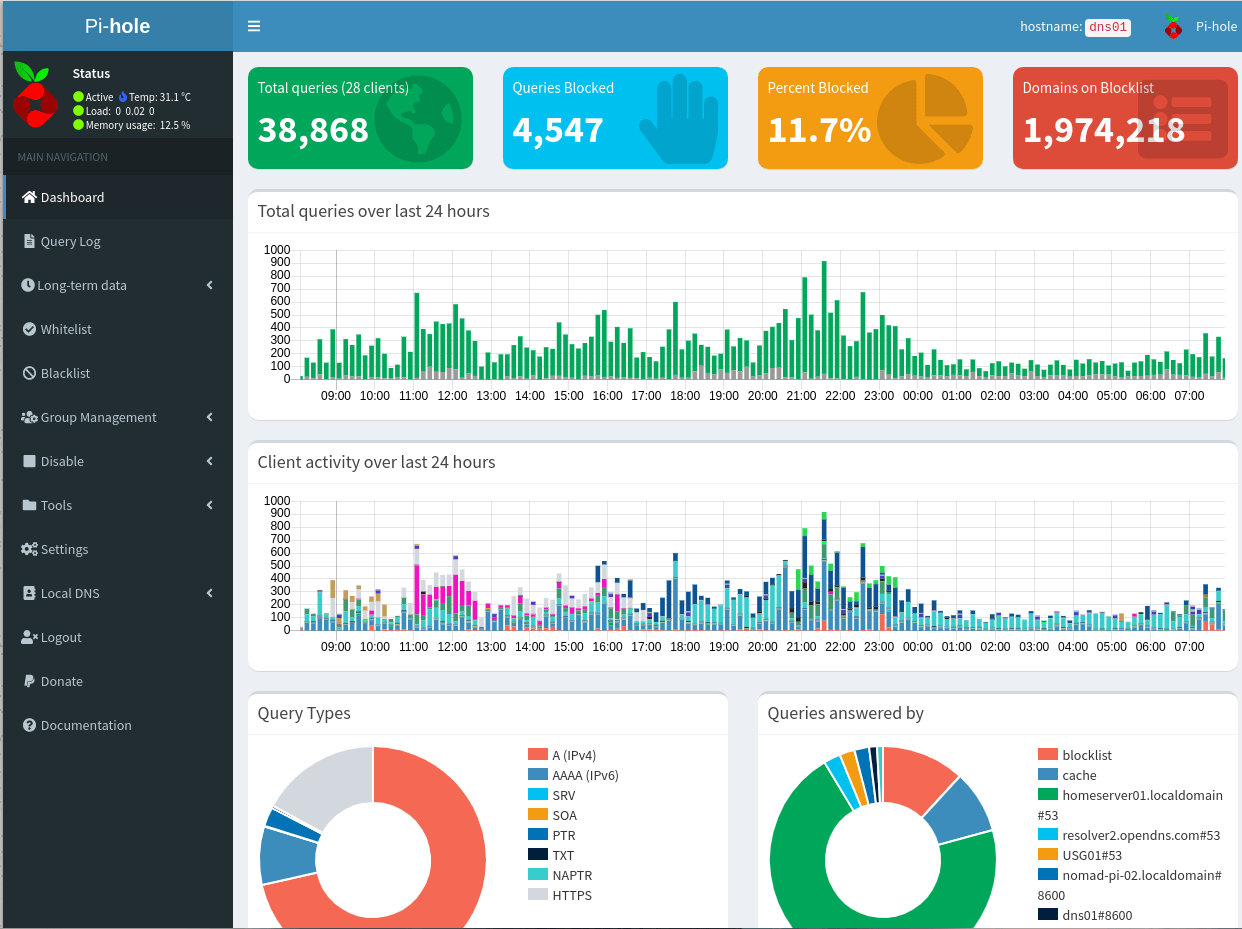
- Open a web browser and go to the address displayed on the output of the installation command, then log in to check that everything is running.
- Update the DNS Servers on your local machine to point to the PiHole IP Address then browse the internet, you should see traffic starting to be graphed on the interface and ad sites such as google ads being blocked.
Multiple Pi-Hole instances
If you’re running multiple Pi-Hole servers we’ll need to setup a sync of the database that contains the blocklist. Fortunately there’s a tool to deal with this for us called Gravity Sync so let’s go ahead and set that up now.
Decide which of your PiHole servers will be your “primary”. This is where you’ll make all your changes, and they will be synchronised to the secondary server.
Follow the gravity sync installation instructions, ensuring that you execute the commands on the appropriate server.
Once Gravity is installed and configured, make a change on the primary such as adding a site to the blocklist, and then log on to the secondary PiHole and run the gravity-sync.sh command. Now log in to the admin interface on the secondary server and make sure that the change to the blocklist has shown up.
NOTE: If you decide to automate the Gravity Sync, I’d recommend doing it once a day in the middle of the night. I’m not 100% sure yet, but it does look like Gravity Sync prevents DNS queries from succeeding whilst the sync is in place, resulting in brief outages of your internet access. I’ll be troubleshooting this very soon and amending this post if that does turn out to be the case!
Configuring the network to use the new servers
Now that the PiHole boxes have been configured and are running, it’s time to switch all our network devices over to start using them, and we do this by updating the DHCP options on our router.
If you’re running Unifi, then you’re looking for the DHCP Nameserver section in the network configuration:

If you’re using another router, then you’ll want to update the settings accordingly in the relevant section of your admin console - look for “DNS Servers” or similar, and if they’re currently set to something other than your PiHole boxes then change it.
Finally, log in to the admin consoles on your PiHole servers and take a look at the dashboards, you should start to see multiple clients and sites being accessed, with ad sites such as google tag manager and the like being blocked.
If you’ve read this far, well done - this is definitely one of the longest posts I’ve written so far on this blog and one of the most technical.
Next time, we’ll look at installing the Container Orchestration and Service discovery parts of the platform in preparation for configuring our monitor and logging solution!